Sunday, September 6, 2015

Tutorial - Zoe's Ring

Hello everyone!

I've got a new tutorial for you today; a ring set with a cabochon. I've named it after my niece who is just awesome :3

This one might appear kind of complicated but really it's pretty straightforward. Hope you enjoy it, and if you make one, please show me! :)


❦  ❦  

Note: this tutorial is protected by an International Creative Commons Attribution-NonCommercial-ShareAlike licence. This means that you are free to post this wherever you like as long as you give proper Attribution (that is, to me, Jet Kosanke, and my website, malfaitluciu.blogspot.com), it may not be used commercially (you're not allowed to make money off it, that is, sell this tutorial to other people for money), and you're free to make changes to it as long as you also share it under these same restrictions (that is, you still give Attribution to me, you don't sell it, and you allow it to be shared freely.) For more information, click the Creative Commons link at the end of the tutorial.By the way- NonCommercial doesn't mean you can't sell works you make using this tutorial. If you make a necklace, bracelet, or whatever using this tutorial, feel free to sell it- however, you may not mass-produce it, and the Attribution part still applies, that is, you still have to attribute the design to me.If you're unsure if what you want to do is allowed, just ask me! I'm really pretty laid back about things like this :) I'd rather share my knowledge and discoveries for free so others can learn than charge money for my tutorials. With all that said, on to the good stuff! :)


❦  ❦  

Click any image to view a larger version

Materials

  • 1 14x10mm glass or stone cabochon (this tutorial uses a vintage glass cab from myAtlantis on Etsy; another great source is Yummytreasures on Etsy)
  • 24 inches of 20 gauge round wire
  • ~40 inches 26 gauge round wire
  • ~35 inches 20 gauge 1/2 round wire
Tools
  • Chain nose pliers
  • Flush cutters
  • Ring mandrel
Let's get started!


1.


Cut three 8" lengths of 20 gauge round wire. Decide what size you want your ring to be, and wrap one of the three lengths around your ring mandrel. It helps to first wrap your wire tightly at a size or two smaller than the size you want, then slide the wire down to the size you want. This will help ensure your ring comes out at the correct size instead of being too big.

2.


Your wire should be in a circle with two 'tails' - bend the tails upward, but make sure that the wires overlap for about 1/4 inch to 3/8 inches.

3.


Straighten out the circle in the wire, but be sure to keep the bends you made in the last step.

4.


Cut 16 inches of 26 gauge wire and 16 inches of 20 gauge half round wire. Wrap them both around the 20 gauge wire at the same time, just before the first bend in the 20 gauge wire. It's ok if this part is messy, we'll be undoing it later.

5.


Add the other two 20g wires cut in the first step, and use the 26g wire and the 20g half round wire to wrap the three 20g base wires together. Notice how the wrapping alternates from half round to 26g. By wrapping those two wires around the base wires at the same time, you end up with this look. It's best to continue wrapping by first wrapping the 26g around once, then the half round around once, switching back and forth. This step can also be done with only 26 gauge round or 20g half round if you prefer, but be sure you double the length of the wire when you cut it so you'll have enough to go down the length of the ring band.

6.


Continue wrapping until you get to the second bend in the 20g base wire.

7.


Wrap the wires around your ring mandrel again, starting at a smaller size and then moving it down the mandrel to the size you want. Note the section in the middle marked in purple where the wires on each end 'overlap'.

8. 


Unwind the wrapping wires in the area marked in purple in the last step. Adjust the size of your ring one more time by wrapping it around a smaller size on the mandrel and then sliding the wire down to your preferred size.

9.


Cut a 3" length of half round wire, and use it to bind the base wires together as shown, snip off the excess, and press the ends flat with your pliers.

10.


Bend the topmost base wire up, and use a 10" length of 26g wire and wrap around the base wire for 1 inch.

11.


On the middle base wire, use 8" of half round wire to wrap, also for 1 inch.

12.


Repeat steps 10 and 11 on the base wires on the opposite side.

13.


Carefully gather a 'set' of 3 base wires together and bend them up and over so they're pointing in the opposite direction. Repeat on the other side.

14.


This part can be a little fiddly, but it's not too terribly bad. Insert your cabochon so the 2 sets of three base wires are positioned across the top and bottom of the cab. Notice that the cab is not oriented straight up and down, but instead it lays at a bit of a diagonal.

15.


On one side, guide the three base wires up around the band and then push the ends down through the ring band so they're 'hooked' onto the band.

16.


Repeat the last step on the other side (these base wires will be pointing down, and you want to bend them UP through the ring band).

17.


Guide the base wires up around the band on both sides.

18.


Trim the wire ends somewhat close to the band; repeat on the other side.

19.


Carefully bend the wires cut in the last step around to the back of the band. Try to push them down pretty firmly with your pliers. Repeat on the other side, and you're done!

Here's a look at the back/inside of the ring, for reference-


I hope you enjoy making this ring! If you have any questions or to show me what you've made with this tutorial, let me know in the comments :D


Creative Commons License


Today I'll leave you with my mom's cat Vinnie, who seriously sleeps like this for some reason.


Til next time!


Thursday, September 3, 2015

Tool Review - Conetastic Cone Mandrel Tool

Hello everyone!

Today I have another tool review for you. My last tool review featured Convex-Flat nose pliers. This time, I'm going to review the Conetastic Cone Mandrel tool from Artistic Wire.


This little tool was created by Sandra Lupo in order to more easily create custom bead cones/caps using wire. 

It could seem like a one trick pony, but because it includes cone mandrels in three different sizes it is somewhat more versatile.


Besides the three cone sizes, this tool also comes with a hex key, used to swap out the different sized mandrels. All the pieces are stored inside the tool which is a very nice feature (I'd have managed to lose all the parts after a day or so otherwise, so this design is very useful).


Swapping out mandrels is easy with the included hex key. Simply insert the hex key into the screw hole near the top of the tool. A few counter clockwise turns will loosen the screw and allow you to remove one of the mandrels to replace it with one of the other two; insert the mandrel you want to use into the hole on top, and use the hex key to tighten up the screw to secure the mandrel in place.


Each mandrel has a hole near its base in order to secure the wire in place while you use the tool. Just insert your wire into the hole, bend the tail end of the wire to anchor the wire, and then begin your coiling.


The tool isn't difficult to use at all, but I found it still does have a small learning curve. A little bit of practice on scrap wire is useful - in the photo above, you can see my first attempt; there are gaps in the coil which is not very attractive. However, after a bit of playing, I quickly got a feel for it. After inserting the end of the wire into the anchor hole, I found that it's easiest for me to hold the tool in my left hand (I'm right-handed, so lefties can reverse these instructions), guide the wire with my right thumb, and then with my left hand, steadily turn the tool clockwise. Getting the coil started can be a little tricky, as the wire tends to want to slide either up the cone, or down toward the anchor hole. Again, however, ten or so minutes of using it to practice with scrap wire quickly takes care of that problem.


Above are three cones I created with the tool using 20 gauge wire. The one on the left is with the largest mandrel, the medium mandrel in the middle, and the small mandrel on the right. The leftmost cone I'd modified a little bit- I added a small loop at the bottom of the coil to neatly end the wire, and I didn't wrap the wire the entire way up the mandrel. Once i reached the point where I wanted to stop coiling, I took the cone off the tool and then used my flat nose pliers to bend the topmost coil vertically, to create a loop that can be strung with chain or cord. The rightmost cone was the third one I made and you can see how with just a little bit of practice, my cone is neat and even.


In the end, I used the coil made on the largest mandrel to create a wire bead cap for this large glass drop. I added four weaves with 26 gauge wire around the cone- this is the first time I've used this technique but it wasn't too difficult. A little too many tool marks, but for practice, I'm happy with it. After some more practice I intend to replace this bead cap with another one with less marring on the wire.

I got my Conetastic tool from FireflyStudiosAtFDJ on Etsy for $13.50; this is the lowest price I've seen for this tool. This tool is somewhat specialized, but it is very good at what it's designed to do, and I think the price is reasonable for what you get. My only quibble would be that I wish it included a large mandrel component that's shorter and wider at the base- the included mandrels create kind of long-ish cones, but I think a squattier mandrel would be most useful for instances that you want a cone with a wide base but don't want it to be very long from base to tip.


I hope this review has been useful for you! Today I'll leave you with my mom's kitty Vinnie, who loves to curl up in your lap and cuddle and knead and nurse on his 'mommy blanket', purring away. :)

Til Next Time!

Thursday, July 23, 2015

*FLASH SALE*


Announcing a 24 hour Flash Sale at Malfait Luciu Jewelry!


From Noon Friday 7/24 til Noon Saturday 7/25 (EDT)
get
25% OFF ALL ITEMS

Just use coupon code

FLASH25
at checkout.


Happy Shopping! :)

Monday, July 20, 2015

Wire Wrapped Coils

Hello everyone!

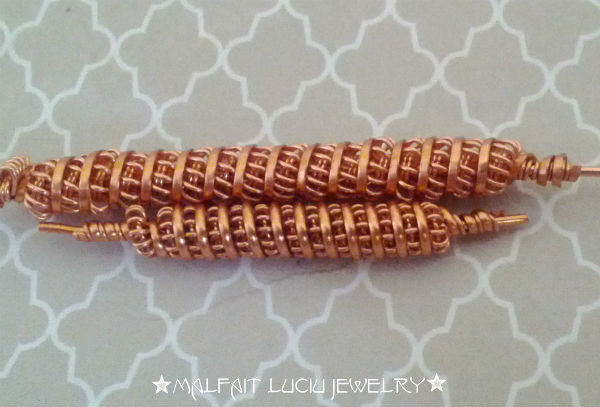
Lately I've been experimenting with wire coil designs.  I've made a few samples of coils I thought I'd share. Just recently, my husband saw I was working on coils, and said "You should make Clapton coils". He and I both use e-cigarettes and he knows a lot about putting them together. When I googled it, up came a ton of functional wire coils, and a lot of them I've seen done in wire work, but many of them were completely new to me and could be adapted to jewelry.

wire wrapped coils

So for the last two days or so I've been working on a bunch of samples of coiled wire and coiled coils. Many of them are inspired in part by the 1/2 round wire I have but rarely use.

These coiled coils play off of each other a lot. The possibilities are endless, and they may look complex, but all use surprisingly simple methods. We all know and love the general purpose single wrap using thick gauge wire as a core to wrap thinner gauge wire around. What happens if we use a single wrap coil to coil around another base wire?

wire wrapped coil

I call this one a 'double coil' because that's exactly what it is. The trick to wrapping something thick like a single coil around a larger gauge wire (I use 20 gauge for this) is that after you finish the initial coil, gently slide the coil off the thick gauge core wire and replace it with smaller wire (I use 26 gauge). The smaller wire is more flexible so when you go to coil that coil onto a larger gauge wire you're not fighting with it or distorting the single coil. It also allows the wrap coils to pull apart a bit, which I think adds to its attractiveness.

However, you can take this double coil and add yet another coil to it!

wire wrapped coil

These both have a third wrap, done with half-round wire. The neat thing about half-round wire is that you can use either side of it for various effects. In the top coil, I added a third coil with the flat side of the half-round wire facing out; in the bottom coil, I wrapped with the rounded part of the wire facing out. 


You may notice that the original wraps in the two coils above are a little different. That's because the original coil has had it's 20 gauge core wire replaced with a length of 26 gauge wire.

wire wrapped coil

You can see the thinner wire in between the coils. However, on the other coil in the photo, the original coil consisted of two 20 gauge core wires that were replaced with two 26 gauge wires for flexibility.

wire wrap coil

You can see the two thinner wires in the core of the original coil. Also, since the original coil was made using two 20 gauge wires, the wraps themselves are wider. This holds true for just about any number of core wires; the more you use, the wider the wrap will be, which opens up many opportunities to test and experiment.

wire wrap coil

Since I was already experimenting with using half-round wire as a third wrap in a coil, I figured I should try it by itself and see what happens if I coiled that coil. It came out looking rather surprising- it reminds me of seed beads! Here also you can clearly see that for the original wrap, I swapped out the 20 gauge core wire for a 26 gauge wire. After that, I just use the 'wire mandrel' that was removed from the original coil as the core of the second wrapped coil.

wire wrap coil

Still experimenting with the half round wire, I paired it with a 26 gauge wire, and then wrapped both around a 20 gauge core wire at the same time. That meant a lot of small movements, but I think the effect is gorgeous. I will definitely be using this one in my designs soon.

wire wrap coil

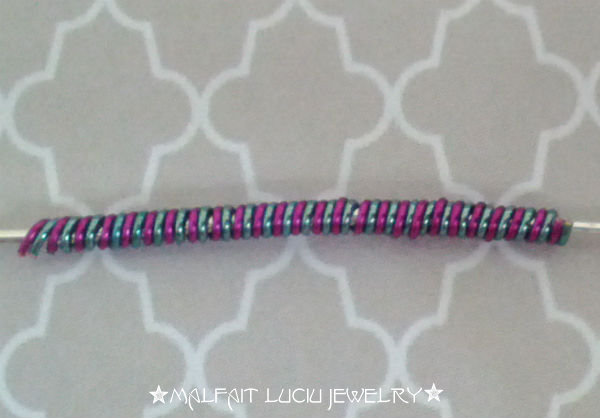
Wrapping two or more wires in different colors at the same time can be fun, too! Really you can wrap as many colors together as you like; just keep in mind you'll have to move each wire around the core one at a time - tedious, but worth it for this look!

wire wrap coil


I got a little crazy here, haha. The 'seafoam' colored wire started as a coil around three lengths of 20 gauge wire, making the coil very wide. After the first coil was finished, I removed the three 20 gauge base wires and replaced them with three 26 gauge wires, for much needed flexibility. Then for the hell of it, I wrapped between the wraps in the seafoam with 20 gauge silver wire. This one, I think I need more practice with, but I can think of so many uses for it!

I took a few notes while making each of these and have worked out some rough estimates of the length of wire needed for one inch of coil. Note, these are just guidelines, and they use only 20 gauge and 26 gauge wires (my default sizes for basically everything I make).

  • Original 26g coil on 20g;  10" 26g = 1" coil
  • Second coil; 25" 26g = 1" coil
  • 2 20g base coils; 14" 26g = 1" coil

I hope I'm explaining these measurements right! Have you ever used coiled coils in your work? Do you have a favorite coil you always go back to? Let me know in the comments, and show me photos! I want to see :)

'Til Next Time!


Friday, July 17, 2015

Giveaway Winner and my New Hair!


Hello everyone! My Custom Ring Giveaway just ended, and the winner is:

Kimberley K.


Congrats, Kimberley! I'll be in touch soon so you can pick out which cabochon you'd like and what your ring size is.

Everyone who guessed what color I dyed my hair correctly were run through Random.org


So, what was the winning color?


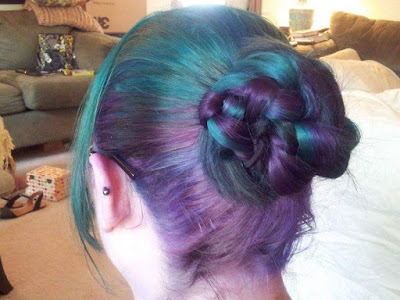
It's actually TWO colors! :) Everyone who commented either teal or purple was entered into the random list generator. In this pic I have my hair up in a double braid bun to get a nice view of both colors.


The lighting in this second pic wasn't very good so the colors don't look exactly like what I actually got dyed. But you can see the purple peeking out from underneath.

HUGE thank you to Diondra at Blown Salon, who gave me exactly the colors I wanted, and who stayed three hours after the salon closed just to finish my hair. She worked on me for SEVEN hours, which is what it takes with all the shampooing and hairdrying and washing out a bunch of times. On top of all of that, she was so friendly and easy to talk to (but didn't talk a lot, I'm always so awkward when a hairstylist starts chatting with me). The single best experience I've ever had at a salon.

And thank you, everyone who entered! If you didn't win this one, I'll be running another giveaway when my Facebook Page hits 200 likes. There's about 50 more to go, so tell all your friends! :)

'Til Next Time!

Wednesday, July 15, 2015

Free Tutorial - Papillon Earrings

Hello everyone!

I think it's time for another in-depth tutorial - this time, my Papillon Earrings!

Mariposa butterfly wire wrapped earrings


❦  ❦  

Note: this tutorial is protected by an International Creative Commons Attribution-NonCommercial-ShareAlike licence. This means that you are free to post this wherever you like as long as you give proper Attribution (that is, to me, Jet Kosanke, and my website, malfaitluciu.blogspot.com), it may not be used commercially (you're not allowed to make money off it, that is, sell this tutorial to other people for money), and you're free to make changes to it as long as you also share it under these same restrictions (that is, you still give Attribution to me, you don't sell it, and you allow it to be shared freely.) For more information, click the Creative Commons link at the end of the tutorial.By the way- NonCommercial doesn't mean you can't sell works you make using this tutorial. If you make a necklace, bracelet, or whatever using this tutorial, feel free to sell it- however, you may not mass-produce it, and the Attribution part still applies, that is, you still have to attribute the design to me.If you're unsure if what you want to do is allowed, just ask me! I'm really pretty laid back about things like this :) I'd rather share my knowledge and discoveries for free so others can learn than charge money for my tutorials. With all that said, on to the good stuff! :)


❦  ❦  

Click on any image to view a larger version.


Materials (for 1 earring):
  • Dead soft 20 gauge wire - 3 inches
  • Dead soft 26 gauge wire - 50 inches
  • 40ss Swarovski flat back rhinestones in Crystal Volcano color (3)
  • 40ss rhinestone Montee settings (3)
  • short scrap of 20 gauge wire (color doesn't matter, we'll be using it as a mandrel)


1. Cut a 3 inch length of 20 gauge wire.


2. Use your chain nose pliers to make a tiny little curl in one end of the wire. The tinier the better!


3. Flatten  the curl you made in the last step so that the wire end is touching the tail end and there's no gap (or very little gap) in the center of the little coil.


4. Use your flat nose pliers to grasp the curl, and then wind the wire around the little curl, turning as you go. Be patient and methodical here, don't rush it. Tiny movements and bends are best.


5. Stop coiling when the spiral is about the same diameter as the rhinestones (really you can coil to your heart's content and make the spiral as large or small as you want, I just like the way it looks when it's the same size as the rhinestones)


6. Bend the tail of the spiral straight up.


7. Make another bend, about a quarter of an inch above the bend in step 6.


8. Use your round nose pliers and make a loop with a tail sticking out to the side.


9. Wrap the tail around the straight part of the wire two or three times. Take your time here, keep a light touch with your pliers, and bend bit by bit.


10. Cut a 6 inch length of 26 gauge wire. Use your round nose pliers to make a loop, but leave the tail sticking out for a moment.


11. Slide the tail of your 26g wire into the loop in the spiral dangle.


12. Wrap the tail of the 26g wire around itself a couple of times to create a sturdy connection.


13. Set the spiral aside for now. Take your scrap of 20g wire and begin wrapping it with 18 inches of the 26g wire.


14. Slide the coil off the 20g scrap wire. Make three more coils- you want to make two coils 1 3/4 inches long, and two coils 1 inch long (uses about 12 inches of 26g wire).


15. Set the coils aside, and pick up the spiral dangle with the 26g wire attached. Slide a montee onto the thinner wire.


16. Slide on two more montees.


17. Make a wrapped loop at the top, and try to position it so that the montees are really nice and snug together.


18. Cut a 13 inch length of 26g wire. Slide it through the horizontal channel of the first montee. Slide it through to the middle of the wire. You want equal halves of wire, one coming out each side.


19. Slide on one of your short coils from earlier onto the wire we added in the last step. After you've strung the coil on, pass the core wire through the horizontal channel of the middle montee, and pull tight!


20.  Repeat on the other side, making sure you're using the shorter length of coils.


21. Add the top halves of the wings the same way.


22. We have to do something with the two pieces of wire sticking up, so I like to use the tails to wrap three or four times around the top of the top half of the wing, right next to the crystal. Then I trim the excess. Repeat on the other side.


23. Mostly done, all that's left is to use your fingers to shape the two segments of each wing into a pleasing arrangement.


Add an earwire and you're done!


Creative Commons License


I hope you enjoyed my tutorial! If you use it to make something, please leave me a link in the comments; I would be thrilled to see it!

Don't forget, my Custom Ring Giveaway ends tomorrow! It's super easy to enter, just one comment is required :)

'Til Next Time!