Friday, June 29, 2012

Fishtail Tutorial

Hello! It's been awhile, I know, but I have a new tutorial now to make up for my absence. I came up with this design just from fiddling around with some short bugles and some seeds yesterday, and ended up with a pretty nifty design, if I do say so myself. It's sculptural and dramatic, but really quite easy to stitch- it works up quickly, too.


The lovely ladies over at the OTTBS facebook page inspired me to name this 'Fishtail', which I think makes perfect sense :D So, let's get started. I apologize in advance for some of the blurry pics, but i think you can still see what's going on with them. As always, if you have any questions or if anything is unclear, please let me know!

❦  ❦  

Note: this tutorial is protected by an International Creative Commons Attribution-NonCommercial-ShareAlike licence. This means that you are free to post this wherever you like as long as you give proper Attribution (that is, to me, Jet Kosanke, and my website, malfaitluciu.blogspot.com), it may not be used commercially (you're not allowed to make money off it, that is, sell this tutorial to other people for money), and you're free to make changes to it as long as you also share it under these same restrictions (that is, you still give Attribution to me, you don't sell it, and you allow it to be shared freely.) For more information, click the Creative Commons link at the end of the tutorial.

By the way- NonCommercial doesn't mean you can't sell works you make using this tutorial. If you make a necklace, bracelet, or whatever using this tutorial, feel free to sell it- however, you may not mass-produce it, and the Attribution part still applies, that is, you still have to attribute the design to me.

If you're unsure if what you want to do is allowed, just ask me! I'm really pretty laid back about things like this :) I'd rather share my knowledge and discoveries for free so others can learn than charge money for my tutorials. With all that said, on to the good stuff! :)

❦  ❦  

Click on any image to view a larger version.

Materials:
  • your favorite needle and thread
  • size 11/0 cylinder beads
  • 5mm bugles (I believe. The bugles need to be as long as two cylinders are high.)
  • OPTIONAL: fringe beads, drops, or magatamas. even daggers would work and look nifty
  • your favorite music
  • an icy mojito or margarita- or three (also optional, but nice to have)

Step One


String four seeds on a comfortable length of thread. I like to use one 'wingspan', personally.


Step Two


Go through all the beads again to form a loop.


Step Three


Pull tight and knot securely.


Step Four


Needle through the two beads next to where you knotted and pull through.


Step Five


Pick up two seeds, then go back down the two beads you went through in the last step.


Step Six

Go back through the two beads you just added.


Step Seven

Continue in this way until your strip is ten beads long.


Step Eight

Now we start the herringbone stitch. Pick up two bugles, and then stitch down through the two beads next to the beads your thread is coming out of.


Step Nine

Stitch up through the two beads next to the beads your thread is coming out of.


Step Ten

Repeat steps eight and nine across the row until you have stitched a total of five stitches.


Step Eleven

Here we're going to 'step up'. Instead of the way it's usually done in herringbone, where you add a bead, then stitch up through the bead above the one your thread is coming out, we're going to do something different.

Stitch up through the ONE bead next to the one your thread is coming out of. Don't stitch through both seeds, just the one.

(Of course, if you wanted to do it the other way and add a bead, go for it! I just chose not to)


Step Twelve

Now, Stitch up through the bead DIAGONAL from the bead your thread is coming out of.


Step Thirteen

Now, needle through the bugle above the bead your thread is exiting.


Step Fourteen

Now that we've 'stepped up', we're going to stitch another row of herringbone.

Add two bugles, go down through the bugle next to the one your thread is exiting. (Don't go down through the seeds below it, just go through the one bugle.)


Step Fifteen

Stitch up through the bugle next to the one your thread is exiting.


Step Sixteen

Repeat steps fourteen and fifteen till you reach the end of the row. Your thread should be exiting the last bugle in the previous row, as shown.


Step Seventeen

Now we have to reverse the direction our thread is going in. Locate the thread 'bridge' between the last two seed beads in the second row of beads. You're going to slip your needle UNDER this thread 'bridge', then pull your thread all the way through. This anchors your thread so that you can go back the way you came through the bugle your thread is coming out of.

I like to call this a 'turnaround'.


Step Eighteen

Stitch up through the two bugles on the edge of your strip, as shown.

Then, stitch a row of herringbone in bugles- five stitches.


Step Nineteen

Now we're going to do a 'turnaround' again. It's easier this time, because the herringbone gives you a little gap between the bugles that is easy to put your needle through. Put your needle through the gap between the first two bugles in the first row of bugles, as shown- then pull your thread through.


Step Twenty


Now, stitch up through the two bugles on the edge of the strip, as shown.


Step Twenty One

This row is still herringbone, but with a small addition. Pick up two bugles and stitch down through the bugle next to the one your thread is exiting, as shown. DON'T go through the next bugle in line, though.


Step Twenty Two

Here we add one seed bead. By now you can probably see how the beadwork is starting to 'fan out'- we're just filling in some of the space between the columns of herringbone.


Step Twenty Three

Now we go up through the next bugle in line. We're going to repeat this across the whole row.


Step Twenty Four

When you get to the end of the row, do a 'turnaround'.


Step Twenty Five

We're going to do the same thing in this row as the last row, except we're adding two seeds between each stitch instead of just one. Pick up two bugles, go through the bugle next to the one your thread is exiting, pick up two seeds, go up through the next bugle, and repeat.


Step Twenty Six

At the end of the row, do a 'turnaround'.


Step Twenty Seven

Instead of adding two bugles like usual here, we're going to add one fringe bead (or drop or magatama or dagger or whatever you like) and go back down the bugle next to the one your thread is exiting.

NOTE: The fringe bead is optional. If you don't have fringe beads or don't want to add fringe beads at all, just go back down through the next bugle as usual without adding any bead. It looks just as nifty without a fringe or drop as it does with. It's up to you :)


Step Twenty Eight

Now, just like the last row, we're going to pick up seeds before going up through the next bugle- THREE beads this time. Don't get carried away, though! We aren't doing this across the entire row.

After you stitch up through the next bugle (the third one in this row) instead of adding beads, go back down through the next bugle without adding any beads.


Step Twenty Nine

At this point, we're creating the base row for the next 'fin'.

Pick up two seeds, then go back down the bead your thread is exiting.

This is the same concept as what we did with the very first row of seeds at the beginning, but we're substituting the existing bugle for two seeds. I hope that made sense.


Step Thirty

Stitch up through the two beads you just added.


Step Thirty One

We're going to repeat step twenty nine and thirty here. Pick up two seeds, go back up through the beads added in step thirty, then go back down through the two seeds you added in this step.


Step Thirty Two

Stitch up through the next bugle in the row.


Step Thirty Three

Stitch down through the last two seeds added.


Step Thirty Four

Stitch back up the bugle next to where your thread is exiting, then down through the next bugle in the row.


Step Thirty Five

Now we repeat steps twenty nine through thirty four. Almost done with the fin!


Step Thirty Six

Now, like at the beginning of this row, we pick up three seeds, then stitch up through the next bugle in the row.


Step Thirty Seven

String a fringe bead (or don't), go down through the last bugle in the row, do a 'turnaround', then work your needle back through the existing beadwork until your thread is coming out of the bugle shown in the image.

Your first fin is done!


Step Thirty Eight

Now, we add two bugles and go down through the bugle next to the one your thread is exiting. This is the same concept as our first row of herringbone at the beginning.


Step Thirty Nine

Stitch up through the two seed beads next to the bugle your thread is exiting.


Step Forty

Continue herringbone stitches with bugles across the row- five stitches total.


Step Forty One

From here, repeat from step fourteen until your strip of fishtails is as long as you like :)


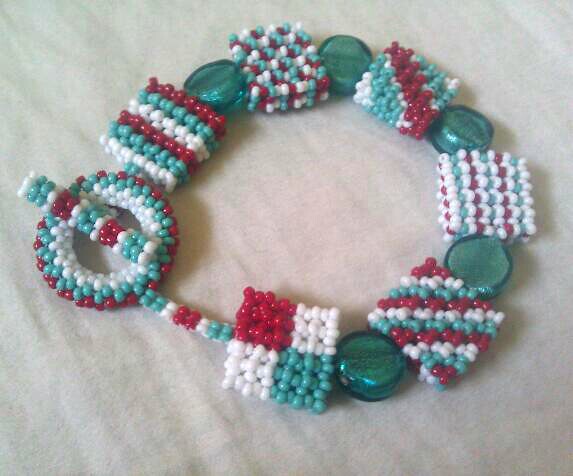
And there you have it! Whew. I haven't finished a bracelet with this method yet, but I'm going to continue off of what I stitched up for this tutorial. I have a clever idea for a clasp, but I don't know if I can pull it off, so I won't say yet what it is. I'll be sure to post pictures when it's finished.


If you create something using this tutorial, I'd love to see it! Email me photos of your work (with a link to your blog if you have one) to malfaitluciu@gmail.com - I'd like to create a gallery page on my blog featuring your creations made using this tutorial (or any of my tutorials) with a link back to your blog, too :) Don't be shy, let me show off your work! :)


Creative Commons License


Until then, I'll leave you with this; my mother's kitty Jinx, sitting in his favorite kitty-hammock. I love love love his perpetually sleepy eyes :3


'Til Next Time!


Wednesday, January 25, 2012

January Moodboard Piece (and a bitch session)

Well, here it is- my piece for the January Moodboard at OTTBS.

LET ME TELL YOU- this thing frustrated me at every turn! Argh!

The strap is made with Gwen Fisher's Super RAW in Miyuki cubes and Czech 11/0s in white, embellished with silver Tohos in 8/0. The focal and the open half of the toggle are both the same, with a black glass pillow bead in the middle of the focal.
My first complaint- the cubes are a little irregular- enough to make this piece look wonky and wobbly. Second complaint- you can still see the threads holding the open square beads in place DESPITE me taking a Sharpie to them multiple times. Third complaint- the silver 8/0s aren't enough to fill the holes between the cubes, but four 11/0s were too much! So there's thread showing there, and augh I hate thread showing. HATE IT.
I guess the one good thing about this is that, despite all the frustrations, I plugged away and finished it. I really try to come up with something for every Moodboard, and although I'm not entirely pleased with this piece (understatement), at least I stuck with it and finished it. I suppose that counts for something!

I'll leave you today with Trinity and her pretty green eyes.

'Til Next Time!

Saturday, January 21, 2012

Where have I been?

Oi- apologies for the long pause in posts there! I can't say there's a specific reason for it- but I HAVE been beading- a lot!

It's a bit overdue, but I thought I'd post some completed OTTBS Moodboard pieces. First, from the October Moodboard (click to see my entry and everyone else's lovely pieces). I created two, but the main one is my "Biscuit Bracelet" (you can see the pieces of the bracelet in this post).


I finally decided to stitch them together with some teal foiled glass coin beads I had. In the true spirit of OTTBS, I dug these out from my stash- I had six, so I used up all but one in this piece. This is also my first peyote toggle clasp. Hooray!


 Next is a pendant in Gwen Fisher's "Super RAW" (click for her free video tutorial of the technique). Super Raw is very fun! It seemed complicated to me at first, but it's actually very intuitive and satisfying. AND I 'tackled my stash' beautifully with this one. The red ball chain and the big blue 6/0's have been sitting in boxes for aaaages. Very satisfying to use them up!


Next is my entry for the November Moodboard (click to see all the other people's lovely entries). This was a challenge at first- the moodboard colors were red and green- christmas colors- YUCK. So, I was determined to make something in red and green that doesn't make one think of christmas at all. (And again, I tackled a good bit of stash here!). It's a twisted herringbone rope using 15/0 green seeds and 11/0 red seeds. The difference in sizes gives this a lovely spirally rope that feels very nice between your fingers. I added a simple round peyote ring at one end, and for the other half of the clasp, two beaded bead 'cherries' and a lucite leaf. You put the berries through the ring to close the clasp. The cherries, paired with the rope that reminded me of a caterpillar, led me to name this one "Cherry Caterpillar". Not christmassy at all! In fact, it reminds me of springtime :)


I have some other pieces I've been working on- I'll post them next. One includes a bracelet using Preciosa's new Twin Beads.

For now though, I leave you with Neo sniffing my bacon-flavored lollipop. (Sounds gross, but it was quite tasty!)

'Til Next Time!


Saturday, November 5, 2011

Birthday Present!

I just have to brag a little here- yesterday I had a wonderful early birthday dinner of sushi and udon with my mom, my best friend, and a favorite family friend. I had lots of sushi, lots of warm sake, and lots of fun! My mom showered me with lots of wonderful gifts, but my absolute favorite is this incredible purple labradorite ring, made by AshleySpatula on Etsy. Just look at this thing!


Isn't it just incredible? It's huge, and full of fire. I'm so tickled, I've wanted a labradorite statement ring for years, and this one is just perfect. :)