Thursday, July 23, 2015

*FLASH SALE*


Announcing a 24 hour Flash Sale at Malfait Luciu Jewelry!


From Noon Friday 7/24 til Noon Saturday 7/25 (EDT)
get
25% OFF ALL ITEMS

Just use coupon code

FLASH25
at checkout.


Happy Shopping! :)

Monday, July 20, 2015

Wire Wrapped Coils

Hello everyone!

Lately I've been experimenting with wire coil designs.  I've made a few samples of coils I thought I'd share. Just recently, my husband saw I was working on coils, and said "You should make Clapton coils". He and I both use e-cigarettes and he knows a lot about putting them together. When I googled it, up came a ton of functional wire coils, and a lot of them I've seen done in wire work, but many of them were completely new to me and could be adapted to jewelry.

wire wrapped coils

So for the last two days or so I've been working on a bunch of samples of coiled wire and coiled coils. Many of them are inspired in part by the 1/2 round wire I have but rarely use.

These coiled coils play off of each other a lot. The possibilities are endless, and they may look complex, but all use surprisingly simple methods. We all know and love the general purpose single wrap using thick gauge wire as a core to wrap thinner gauge wire around. What happens if we use a single wrap coil to coil around another base wire?

wire wrapped coil

I call this one a 'double coil' because that's exactly what it is. The trick to wrapping something thick like a single coil around a larger gauge wire (I use 20 gauge for this) is that after you finish the initial coil, gently slide the coil off the thick gauge core wire and replace it with smaller wire (I use 26 gauge). The smaller wire is more flexible so when you go to coil that coil onto a larger gauge wire you're not fighting with it or distorting the single coil. It also allows the wrap coils to pull apart a bit, which I think adds to its attractiveness.

However, you can take this double coil and add yet another coil to it!

wire wrapped coil

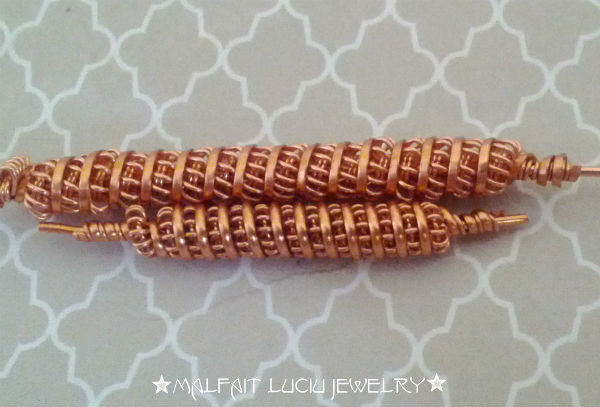
These both have a third wrap, done with half-round wire. The neat thing about half-round wire is that you can use either side of it for various effects. In the top coil, I added a third coil with the flat side of the half-round wire facing out; in the bottom coil, I wrapped with the rounded part of the wire facing out. 


You may notice that the original wraps in the two coils above are a little different. That's because the original coil has had it's 20 gauge core wire replaced with a length of 26 gauge wire.

wire wrapped coil

You can see the thinner wire in between the coils. However, on the other coil in the photo, the original coil consisted of two 20 gauge core wires that were replaced with two 26 gauge wires for flexibility.

wire wrap coil

You can see the two thinner wires in the core of the original coil. Also, since the original coil was made using two 20 gauge wires, the wraps themselves are wider. This holds true for just about any number of core wires; the more you use, the wider the wrap will be, which opens up many opportunities to test and experiment.

wire wrap coil

Since I was already experimenting with using half-round wire as a third wrap in a coil, I figured I should try it by itself and see what happens if I coiled that coil. It came out looking rather surprising- it reminds me of seed beads! Here also you can clearly see that for the original wrap, I swapped out the 20 gauge core wire for a 26 gauge wire. After that, I just use the 'wire mandrel' that was removed from the original coil as the core of the second wrapped coil.

wire wrap coil

Still experimenting with the half round wire, I paired it with a 26 gauge wire, and then wrapped both around a 20 gauge core wire at the same time. That meant a lot of small movements, but I think the effect is gorgeous. I will definitely be using this one in my designs soon.

wire wrap coil

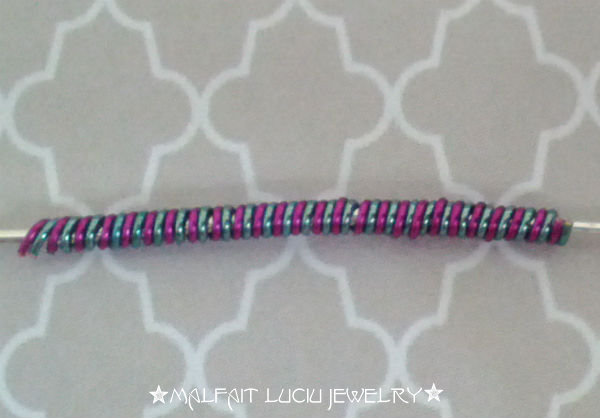
Wrapping two or more wires in different colors at the same time can be fun, too! Really you can wrap as many colors together as you like; just keep in mind you'll have to move each wire around the core one at a time - tedious, but worth it for this look!

wire wrap coil


I got a little crazy here, haha. The 'seafoam' colored wire started as a coil around three lengths of 20 gauge wire, making the coil very wide. After the first coil was finished, I removed the three 20 gauge base wires and replaced them with three 26 gauge wires, for much needed flexibility. Then for the hell of it, I wrapped between the wraps in the seafoam with 20 gauge silver wire. This one, I think I need more practice with, but I can think of so many uses for it!

I took a few notes while making each of these and have worked out some rough estimates of the length of wire needed for one inch of coil. Note, these are just guidelines, and they use only 20 gauge and 26 gauge wires (my default sizes for basically everything I make).

  • Original 26g coil on 20g;  10" 26g = 1" coil
  • Second coil; 25" 26g = 1" coil
  • 2 20g base coils; 14" 26g = 1" coil

I hope I'm explaining these measurements right! Have you ever used coiled coils in your work? Do you have a favorite coil you always go back to? Let me know in the comments, and show me photos! I want to see :)

'Til Next Time!


Friday, July 17, 2015

Giveaway Winner and my New Hair!


Hello everyone! My Custom Ring Giveaway just ended, and the winner is:

Kimberley K.


Congrats, Kimberley! I'll be in touch soon so you can pick out which cabochon you'd like and what your ring size is.

Everyone who guessed what color I dyed my hair correctly were run through Random.org


So, what was the winning color?


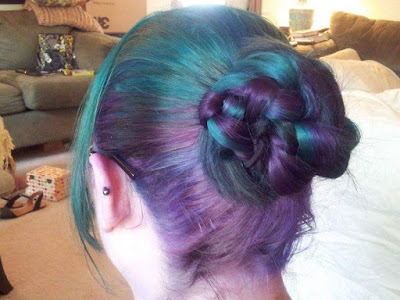
It's actually TWO colors! :) Everyone who commented either teal or purple was entered into the random list generator. In this pic I have my hair up in a double braid bun to get a nice view of both colors.


The lighting in this second pic wasn't very good so the colors don't look exactly like what I actually got dyed. But you can see the purple peeking out from underneath.

HUGE thank you to Diondra at Blown Salon, who gave me exactly the colors I wanted, and who stayed three hours after the salon closed just to finish my hair. She worked on me for SEVEN hours, which is what it takes with all the shampooing and hairdrying and washing out a bunch of times. On top of all of that, she was so friendly and easy to talk to (but didn't talk a lot, I'm always so awkward when a hairstylist starts chatting with me). The single best experience I've ever had at a salon.

And thank you, everyone who entered! If you didn't win this one, I'll be running another giveaway when my Facebook Page hits 200 likes. There's about 50 more to go, so tell all your friends! :)

'Til Next Time!

Wednesday, July 15, 2015

Free Tutorial - Papillon Earrings

Hello everyone!

I think it's time for another in-depth tutorial - this time, my Papillon Earrings!

Mariposa butterfly wire wrapped earrings


❦  ❦  

Note: this tutorial is protected by an International Creative Commons Attribution-NonCommercial-ShareAlike licence. This means that you are free to post this wherever you like as long as you give proper Attribution (that is, to me, Jet Kosanke, and my website, malfaitluciu.blogspot.com), it may not be used commercially (you're not allowed to make money off it, that is, sell this tutorial to other people for money), and you're free to make changes to it as long as you also share it under these same restrictions (that is, you still give Attribution to me, you don't sell it, and you allow it to be shared freely.) For more information, click the Creative Commons link at the end of the tutorial.By the way- NonCommercial doesn't mean you can't sell works you make using this tutorial. If you make a necklace, bracelet, or whatever using this tutorial, feel free to sell it- however, you may not mass-produce it, and the Attribution part still applies, that is, you still have to attribute the design to me.If you're unsure if what you want to do is allowed, just ask me! I'm really pretty laid back about things like this :) I'd rather share my knowledge and discoveries for free so others can learn than charge money for my tutorials. With all that said, on to the good stuff! :)


❦  ❦  

Click on any image to view a larger version.


Materials (for 1 earring):
  • Dead soft 20 gauge wire - 3 inches
  • Dead soft 26 gauge wire - 50 inches
  • 40ss Swarovski flat back rhinestones in Crystal Volcano color (3)
  • 40ss rhinestone Montee settings (3)
  • short scrap of 20 gauge wire (color doesn't matter, we'll be using it as a mandrel)


1. Cut a 3 inch length of 20 gauge wire.


2. Use your chain nose pliers to make a tiny little curl in one end of the wire. The tinier the better!


3. Flatten  the curl you made in the last step so that the wire end is touching the tail end and there's no gap (or very little gap) in the center of the little coil.


4. Use your flat nose pliers to grasp the curl, and then wind the wire around the little curl, turning as you go. Be patient and methodical here, don't rush it. Tiny movements and bends are best.


5. Stop coiling when the spiral is about the same diameter as the rhinestones (really you can coil to your heart's content and make the spiral as large or small as you want, I just like the way it looks when it's the same size as the rhinestones)


6. Bend the tail of the spiral straight up.


7. Make another bend, about a quarter of an inch above the bend in step 6.


8. Use your round nose pliers and make a loop with a tail sticking out to the side.


9. Wrap the tail around the straight part of the wire two or three times. Take your time here, keep a light touch with your pliers, and bend bit by bit.


10. Cut a 6 inch length of 26 gauge wire. Use your round nose pliers to make a loop, but leave the tail sticking out for a moment.


11. Slide the tail of your 26g wire into the loop in the spiral dangle.


12. Wrap the tail of the 26g wire around itself a couple of times to create a sturdy connection.


13. Set the spiral aside for now. Take your scrap of 20g wire and begin wrapping it with 18 inches of the 26g wire.


14. Slide the coil off the 20g scrap wire. Make three more coils- you want to make two coils 1 3/4 inches long, and two coils 1 inch long (uses about 12 inches of 26g wire).


15. Set the coils aside, and pick up the spiral dangle with the 26g wire attached. Slide a montee onto the thinner wire.


16. Slide on two more montees.


17. Make a wrapped loop at the top, and try to position it so that the montees are really nice and snug together.


18. Cut a 13 inch length of 26g wire. Slide it through the horizontal channel of the first montee. Slide it through to the middle of the wire. You want equal halves of wire, one coming out each side.


19. Slide on one of your short coils from earlier onto the wire we added in the last step. After you've strung the coil on, pass the core wire through the horizontal channel of the middle montee, and pull tight!


20.  Repeat on the other side, making sure you're using the shorter length of coils.


21. Add the top halves of the wings the same way.


22. We have to do something with the two pieces of wire sticking up, so I like to use the tails to wrap three or four times around the top of the top half of the wing, right next to the crystal. Then I trim the excess. Repeat on the other side.


23. Mostly done, all that's left is to use your fingers to shape the two segments of each wing into a pleasing arrangement.


Add an earwire and you're done!


Creative Commons License


I hope you enjoyed my tutorial! If you use it to make something, please leave me a link in the comments; I would be thrilled to see it!

Don't forget, my Custom Ring Giveaway ends tomorrow! It's super easy to enter, just one comment is required :)

'Til Next Time!

Friday, July 10, 2015

Custom Ring Giveaway - Guess my New Hair Color! *CLOSED*

Hello everyone!

Every now and then I get an urge to dye my long black hair something... different. Trying out a new color is always fun, so I thought to myself, 'this could be a fun way to do another giveaway!'

Giveaway Grand Prize

One lucky winner will receive a handmade custom-sized ring with their choice of ONE of the cabochons in the picture below. What the ring will look like is a mystery- you choose one cab and I will make a special unique one of a kind ring just for you!

The Cabochons

These are all vintage glass


All you have to do is: 
  • Leave a comment on this blog post with your name (first name and last initial is fine) guess of what color I dyed my hair AND enter your email address (so I can notify you if you win)

Leaving a comment with your color guess is REQUIRED for your entry to count. If you're having problems commenting on this post, email me at malfaitluciu@gmail.com with your name and email address, and be sure to include what color you think my hair is, and I'll add you to the contest manually. 

In the event that more than one person guesses my hair color correctly, I will take all those names and run them through random.org - the first name on the random list will be the winner. :) The winner will be announced on this blog and will notify the winner by email (so they can tell me which cabochon they want me to use in their ring.)

The giveaway starts today, July 7, and will end on July 16 at 11:59pm.

Also, I still plan to do another giveaway when I reach 200 Facebook Likes, just as I did in the 100 likes milestone giveaway. It's at 149 right now- only 51 likes left until my next giveaway. Feel free to share info about this giveaway; tell your family and friends and if they like my page, The 200 Likes Giveaway will be here in no time!  

Oh, and I promise to post a photo of my newly dyed hair at the end of the giveaway :) 

Also, the handful of people who know what color I'm dyeing my hair are ineligible. Sorry about that, handful of people. Anyway-

Enjoy, have fun, and good luck!

'Til Next Time!


As seen on Hypersweep.com! ”updated


Wednesday, July 8, 2015

Mini Fleur Rings

Hello everyone!

Today I have for you not necessarily a tutorial but more of a how-to. I am still recovering from some intolerable side effects but they are abating, and I'm getting back into the swing of creating. I told myself to just come up with a quick and easy design. These cute little adjustable flower rings worked perfectly!


Here's how I go about making them:


I took a longish piece of 20 gauge wire and made a tiny loop in one end.


Then I wrapped the wire at the size 7 point of my ring mandrel, and made a loop in that end too.


I put the ring form aside and cut a long piece of 26g wire (probably around 30 inches long). I strung on one teeeeeny tiny silver bead and folded the wire in half at the bead.


I picked up a flower bead and strung it onto both ends of the 26g wire, and pulled to snug up the bead against the flower.


Then I bent the two halves of the 26g wire out to either side and set the flower in the middle of the ring form. I usually wrap one half a couple times on one side, then wrap all down half of the shank before I wrap down the opposite side, it just gives it more stability.


And that's it! A cute little adjustable ring. I made a bunch more...


And they make great stacking rings!


I haven't decided yet how I will list these; either individually or as a set.  But they'll be up in my shop soon enough! A fun little project that takes less than an hour to make. Hope you enjoy it and if you make one of your own, please tell me so I can feature it on my blog! :)

Til Next Time~

Tuesday, July 7, 2015

Honeysweet Set

Hello everyone!

For the longest time, I've wanted a honeybee themed necklace. I finally found the money and materials to make one, and earrings, too!


honeysweet set


I'm not sure what's so attractive about hexagons, but it's one of my favorite shapes. I got these from Precious Adornments on Etsy.

honeysweet necklace


I searched high and low for the perfect bee charm, and found one that I just love. It's tiny and dainty and fits perfectly in the brass hexagon. The bee is brass too but shines like gold.

honeysweet earrings

I bought enough bees and hexagons to make a set just for me, but soon found I only had three honey colored glass drops! These I've put up in my shop, available here and here. Stay tuned; soon I will be posting some cute flower rings to go with the bee theme :)

Til Next time!