Showing posts with label handmade jewelry. Show all posts

Thursday, March 30, 2017

How to Use Ammonia and Salt to Patina Copper

Hello everyone!

Lately I've been playing with various techniques of applying patinas to copper. I'm having a blast playing with heat patinas and borax patinas, but I get the most satisfaction from ammonia and salt patinas.


I thought it might be fun to do a little tutorial on the way I apply patina to my pieces. I'll focus on ammonia and salt patinas for now. They are deceptively easy to achieve! Let me walk you through my process :)

Materials:
  • The copper piece you want to patina 
  • A plastic container, for example one of those disposable food storage containers. It must have a lid! I use a large one but a smaller one would work just fine; but it must be a container you're willing to sacrifice and never use to store food in again
  • Ammonia - all I could find at the store was the lemon scented kind but it works just as well as plain old ammonia
  • Table salt
  • Wire - I use 20 gauge base metal wire
  • Something pointy and metal that can be heated - I use an old needle file
  • A small cheap paint brush

The first step is to create your fume container out of your food storage container. Use your pointy tool/needle file, and hold the tip over a flame to make it hot. Then use it to melt a hole in the side of your container. Melt two more holes beside the first one and try to make them even. Repeat this on the other side of the container, making sure it's directly across from your first set of holes and also at the same height as the first holes.


Now, take a few lengths of wire and feed them through the holes, one side to the other. Bend down the excess wire so it doesn't slide right back out. Repeat for the other two pairs of holes. In my container below, you can see the three wires spanning the width of my container.


At this point, pour in a little ammonia. You don't need a lot! I have maybe a centimeter of ammonia in my container. It's the ammonia fumes that interact with the salt and produce the patina, not the liquid itself, so you don't need a lot.                    


CAUTION
Ammonia fumes are very, very strong and are not something you want to be inhaling. It can also hurt your eyes, so please work in a very well ventilated place with safety goggles!


Next, take your copper piece and paintbrush and brush it with some of the ammonia, then set it on top of the wires in your fume container so it's suspended above the ammonia. 

Next, while the piece is still wet, sprinkle a VERY generous amount of table salt onto your piece.


Now comes the waiting. Put the lid on your fume container and carefully move it to a place where it will not be disturbed.

You'll notice after a little while, the salt has turned blue! It's an encouraging sign, but don't get too excited - at this point the blue is only on the salt, not the copper piece beneath.


After leaving the whole assembly alone for awhile, the patina on the copper will slowly build. This takes time; I usually leave my items in the fume container for three days, although you can go longer if you like.

Once the three days are up, it's time to remove your piece. Rinse off the salt crust with a little water, and take a look at your gorgeous patina!


At this point I use a couple coats of ProtectaClear to protect and preserve the patina. Now you're ready to use your patina pieces in whatever jewelry project you have in mind :) Here's another example of this method:


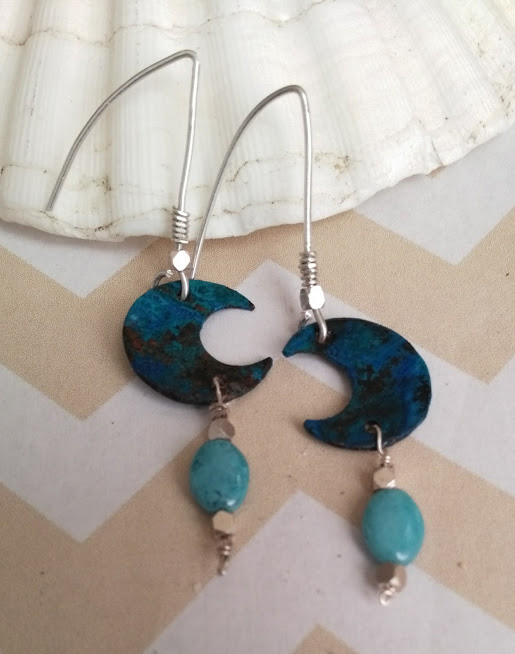
I hope this little mini tutorial is useful! Next I think I'd like to document the process of adding a borax patina to your copper pieces, as I've done here with these earrings:


It's a great method that gives a lovely mottled red color to your copper, and an added bonus is there's no waiting for days for it to develop, it shows up right away! :)

For now, I'll leave you with my sweet boy Neo, keeping me company in my studio (my cats are so spoiled, they get their own little pillow to sit on on my work table! But mainly I put it there because otherwise they like to hop up and lay right down on the table on top of all my work! haha)


Til Next Time!


Friday, March 4, 2016

200 Facebook Likes Giveaway! *CLOSED*

Hello Everyone!

I'm thrilled to announce that we've hit 200 Likes on Facebook! I promised another giveaway when we hit that number and here it is! 

The Prize


The prize this round is a pair of my handmade "Sapphirus" earrings! These are truly 'statement' jewelry- they're long and glamorous and have tons of movement. As always, all the weaving here is done by hand including the hand-hammered custom earwires. I had a lot of fun making these! I rarely use blue in my designs but these are a departure from my 'usual' :)

You can enter by using the Rafflecopter widget below.


This giveaway begins today, 3/4, and ends at 11:59pm on 3/18. I'll announce the winner here on the blog, over on the Malfait Luciu facebook page, and by email. The winner must respond to the email within 48 hours with their home address so I can mail out the prize; after 48 hours without a response, a new winner will be chosen at random.

I'm so excited to see who will win! Thanks so much to everyone who has supported me this far - you're the best! After this giveaway is over, I'll run the next giveaway when I reach 350 Facebook likes, so do feel free to share; I love running these and the more my page is shared, the sooner I'll be able to run another giveaway! :)

Thanks much, and Good luck! <3

Tuesday, November 24, 2015

Goodbye Autumn Jewelry

Hello everyone!

I have been very busy yesterday and today working in my brand new studio space. It's the only space in the house that I feel really belongs to me, and I have some plans to spruce it up some (it IS in an unfinished basement, after all). However, when I visit my mom for Thanksgiving, she's giving me a nice rug to spread on the concrete floor, and I'm going to bring home my massive poster of Trent Reznor (this thing is enormous, my love gave it to me a very long time ago when we were just friends). It was looking rough, ragged edges, etc. But at the time I worked at a framing shop, so I sent it out to get mounted on acid-free foam core with a simple bronze frame. Well, I know exactly where that's going! There's a space on the wall right in front of my work table that is the perfect size for my massive poster of teh sexxiest guy ever :P

Not at all to say I'm not thrilled with the space (I spent a good five hours there today working on a ring I'll put up elsewhere in this post - and with a free tutorial that I should complete by tomorrow, stay tuned!) But I'd love to hang a curtain to hide this one spot in the corner that I'll never use and is an eyesore, and also I'd love a big comfy chair or small loveseat to relax and take a break from the wire a bit.

I've been working with my wire so much these past two days that my fingertips hurt! He'


Cannot for the life of me get a good photo of this but I love it and I finally used my seafoam green wire that I have literally owned for years and never used. Plus there are two teeny tiny pink montees on either side of the bead (which sparkles like craziness).

I've got the photos taken for a tutorial, just have to edit them and then post them, hopefully tomorrow.

❦  ❦  

As anyone who knows me will tell you, I was born for winter. I look forward to cold temperatures the way people can't wait for the hot summer sun. But even though I love winter, I do think that autumn is just too damn short.

So, to 'keep the memory of autumn alive', I'm running a sale on the Fall-themed items in my shop, all marked down for you!

Looking for a statement necklace? This design is available in two colors, brown and bright copper. They're actually quite sturdy, although they look delicate. My favorite parts are the pair of acorns each pendant features - each necklace has one brown glass acorn and one champagne colored Swarovski pearl.


These were $25, but with my Goodbye Autumn Sale, they're only $18 each! Does bright copper draw you in? Or maybe you're more inclined to deep rich brown?


How about a sweet pair of acorn earrings? These faceted glass beads each have their own Vintaj acorn top (quite easily the cutest little finding I've ever seen). These were $10, but for the Goodbye Autumn Sale, they're a steal at $6!


A pair of lucite, somewhat translucent rich brown leaves affixed to hairpins? These are decorative hairpins, not bobby pins. They're intended to adorn hair that is already in an updo. An easy, unusual hair accessory that people will notice! They were $6, but for the Goodbye Autumn sale, they're only $4!


Prefer traditional bobby pins instead of hair pins? My Autumn Palette barrettes are just the thing to add a little touch of fall. These were $7.50 but for the Goodbye Autumn sale, they're only $5!


Today in one of my boxes I found some old lucite leaves and a bronze circle finding. It's laying out on my desk right now in this configuration, but I haven't decided on a design yet. The leaves feel wonderful in your fingers, you'll love their weighty look but light feel. We'll see what I come up with with these!

Today, I'll leave you with Trinity's single white toe <3


Til Next Time!


Monday, November 23, 2015

A New Studio Just for Me!

Hello everyone!

For a long while now, I've been suffering from the dreaded "artist's block". I couldn't even get up the motivation to pick up my pliers- hell, I couldn't even manage to put pencil to paper to doodle some designs!

But, I'm grateful that that seems to have passed. It was a matter of sheer will - you WILL create something today, Jet!

But it's true what they say about being kind to yourself- when I find myself feeling like my work is pointless or bad quality, I ask myself: 'If someone else said that stuff to you, wouldn't you be furious?' In other words, be kindest to yourself.

If it's a motivation problem, or a huge task to handle, I just break it up into small tasks and ignore the big picture. As my mom and Grams are fond of saying: "How do you eat an elephant? One bite at a time". :3 I'm so grateful for having these two ladies and their wealth of wisdom.

So, I desperately wanted to create. I decided to ease into it, with a very simple necklace.


I've had these little metal black bow charms for god knows how long. I have them in silvertone too, but I feel like it gave me enough experience to get back into the swing of creative. I'll list it in the shop soon


These were my next attempt at getting back to my tools and pliers. I wanted to do a simple but elegant shape, with just a little wire wrapping. I could'nt resist putting them on those chains - these earrings will likely not ever stay still, which I think is the fun part.

And of course I went with green and bronze. Bronze wire is my favorite, and I just love the way it looks with greens and purples. These will go up into the shop very soon, too.

Tonight I'll leave you with Trinity, who has been trying for ages to get up to the top shelf of my shelves and finally succeeded (and of course she's sitting on my sewing box :P)


'Til Next Time!

Thursday, July 23, 2015

*FLASH SALE*


Announcing a 24 hour Flash Sale at Malfait Luciu Jewelry!


From Noon Friday 7/24 til Noon Saturday 7/25 (EDT)
get
25% OFF ALL ITEMS

Just use coupon code

FLASH25
at checkout.


Happy Shopping! :)

Tuesday, July 7, 2015

Honeysweet Set

Hello everyone!

For the longest time, I've wanted a honeybee themed necklace. I finally found the money and materials to make one, and earrings, too!


honeysweet set


I'm not sure what's so attractive about hexagons, but it's one of my favorite shapes. I got these from Precious Adornments on Etsy.

honeysweet necklace


I searched high and low for the perfect bee charm, and found one that I just love. It's tiny and dainty and fits perfectly in the brass hexagon. The bee is brass too but shines like gold.

honeysweet earrings

I bought enough bees and hexagons to make a set just for me, but soon found I only had three honey colored glass drops! These I've put up in my shop, available here and here. Stay tuned; soon I will be posting some cute flower rings to go with the bee theme :)

Til Next time!